I have experienced a number of different Mac systems, ranging from the old white MacBook 2006 to iMac and MacMini 2010 and lately MacBook Pro 13" and 15". From time to time, Time Machine has become extremely handy for transferring my data from the old to the new machine.
Nevertheless, a lot of changes, mostly for software development, have often been ignored or reset to the default values. As a result, I often find myself searching around over and over for some desirable settings. Thus, this post is kind of a note-to-self on few useful tweaks for my development box so that I can easily reach out later.
Update: As it turned out that the tweaks and configurations were getting longer and became tedious to follow, I split them into two parts:
Part 1: System tweaks and configurations
Disable System Integrity Protection (SIP)
System Integration Protection (SIP) is a security technology since OS X El Capitan 10.11 aiming at protecting certain system files and folders against malicious software. SIP even limits the access and actions of the root user account on protected parts of OS X. Unfortunately, the folder /usr/local needed for installing many development tools and utilities is under protection as well. That makes a lot of tools like Homebrew fail to install. We can easily check SIP’s current status.
$ csrutil status
System Integrity Protection status: enabled.
The tweak I always do right after installing or recovering a Mac is to disable SIP. Just (re)start macOS in Recovery Mode (restarting or turning on your Mac and immediately pressing ⌘ + R—shortcut to remember R for ‘__R__ecovery’—and wait until macOS boots into its recovery mode. Then open menu and execute the following commands.
$ csrutil disable
$ reboot
Your Mac will reboot and get back to the normal working mode. You can verify SIP status again.
$ csrutil status
System Integrity Protection status: disabled.
Disable Gatekeeper
Gatekeeper was first introduced in OS X Mountain Lion. It is a security feature that prevents the users from launching potentially harmful apps.
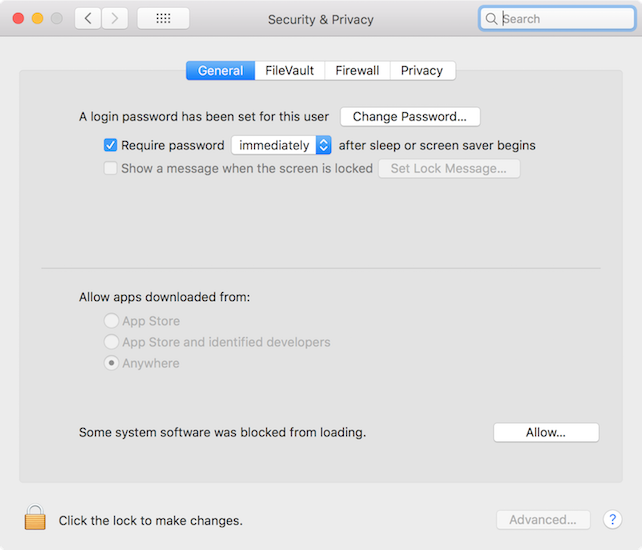
From macOS Sierra and later, however, Apple made Gatekeeper even more restricted. Normal users would see only two choices in System Preferences –> Security & Privacy that “Allow apps downloaded from” either “App Store” or “App Store and identified developers”.
That means only signed apps are allowed to launch, i.e. breaking a lot of useful unsigned apps whose developers cannot afford to pay US$99 yearly membership for Apple Developer Program.
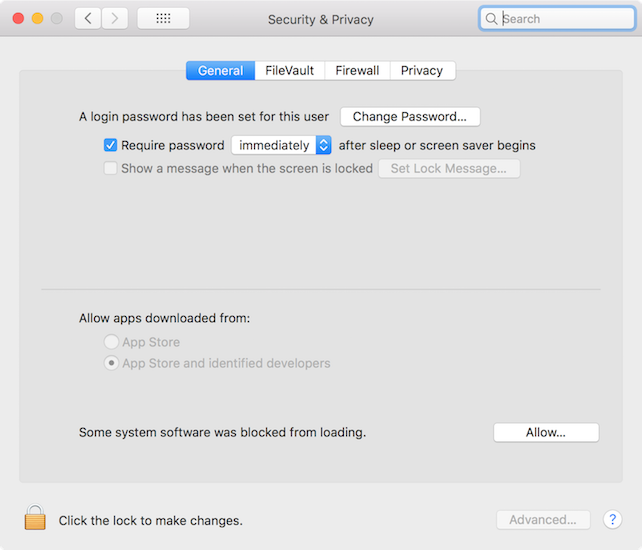
We can circumvent that by disabling Gatekeeper. You do not have to restart macOS but only executing the following command sudo spctl --master-disable.
After that, you will be able to see Gatekeeper being disabled.
Naturally Gatekeeper can be re-enabled at any time with sudo spctl --master-enable.
Revealing ‘~/Library’
In macOS, the folder ‘~/Library’ within users home folder is hidden (since 10.7!?) seemingly to prevent any unintentional changes. It’s not so difficult to navigate to this folder (and any other folders) using command line. In case you want to use Finder to navigate and explore ‘~/Library’, we can simply use the following command.
$ chflags nohidden ~/Library
Enabling Key Repeating
The behaviour for keyboard long pressing in macOS is also of polarised personal taste. A typical behaviour that we often see is that the letter keeps popping out since one holds down a key until the key is released. Some years back this has been changed into ‘Character Picker’. It means when a key is pressed and held, the non-standard characters corresponding characters will pop up as the picture below.

Not a big fan of Character Picker, I rather like characters keep repeating when a key is held. In many cases, this behavior becomes very handy, for instance, when selecting large texts with ⇧ + ↓ ↑ ← →.
For that reason, I always disable that feature in any macOS that I am working on. Unfortunately, this cannot be done with but command line. After each command, you must re-start the editors to see the effect.
# disable 'Character Picker'
$ defaults write -g ApplePressAndHoldEnabled -bool false
# it can be enabled
$ defaults write -g ApplePressAndHoldEnabled -bool true
Another option relating to key repeating is tuning its speed/rate and delay. Luckily, we can do this via . My favourite is ‘fastest’ repeating and ‘shortest’ delay as possible.
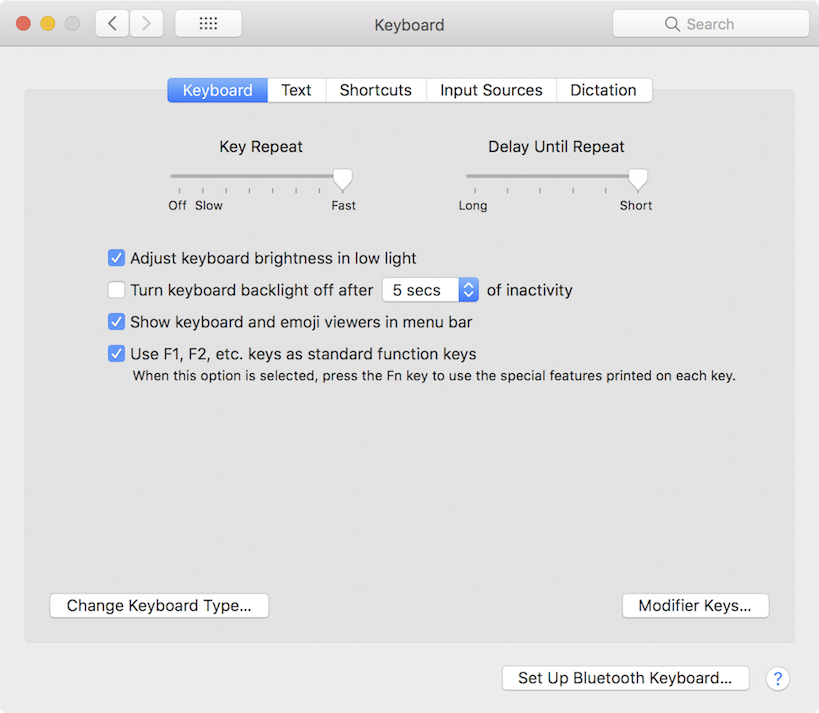
Like many other options, we can change it via command line or fine tuning tool such as Karabiner.
# InitialKeyRepeat: 120, 94, 68, 35, 25, 15 (lower is faster, default is 25)
$ defaults write -g InitialKeyRepeat -int 15
# KeyRepeat: 120, 90, 60, 30, 12, 6, 2 (lower is faster, default is 6)
$ defaults write -g KeyRepeat -int 2
Changing Hostnames
Most of the time, the default host name is not satisfied and you might want to have a cool name for your dev box. Then you are surely not alone. Here and there, you might find some cool combo like harry@hogwart , alice@wonderland, yoda@dagobah, joker@gotham, neo@matrix, frodo@mordor you name it. You can quickly do this via command line.
# change the primary host name
$ sudo scutil --set HostName gotham
# ... do the same for local (Bonjour) host name
$ sudo scutil --set LocalHostName gotham
# and finally, keep the user-friendly computer's name in Finder in sync
$ sudo scutil --set ComputerName gotham
Part 2: Development tools and configurations
In this part, I will focus more on some handy tools and configurations often used for my software development tasks.
Homebrew
Homebrew provides a rich collection of tools I need, mostly open sources, that Apple does not. Installing Homebrew is super easy with a one-liner command. Before that, we only have to install the Xcode command line tools that Homebrew needs to build its tools.
# install Xcode command line developer tools
$ xcode-select --install

# now install Homebrew
$ /usr/bin/ruby -e "$(curl -fsSL https://raw.githubusercontent.com/Homebrew/install/master/install)"
Then we need to add /usr/local/bin and /usr/local/sbin (where Homebrew links the executable files) to the environment variable PATH. This can be done by altering the shell startup scripts. For instance, for Bash shell it is ~/.bash_profile, for Zshell it is ~/.zsh_profile.
export PATH=$PATH:/usr/local/bin:/usr/local/sbin
If you want the Homebrew tools have higher priority than the others, just switch $PATH to the end instead. Moreover, there are many Finder-launched apps, agents and daemons in macOS might also need PATH to find necessary executables (e.g. Intellij IDEA and Eclipse if I’m not mistaken). Fortunately, the launching of these tools would go through macOS launchd and therefore, can be configure with launchctl. So I have to add this line to the end of my .zshrc too.
# this line should be added at the end of .zshrc
/bin/launchctl setenv PATH $PATH
Now I can install necessary tools using brew.
$ brew install ack curl dnsmasq docker gcc git go gradle maven mysql node openssl openssh python3 php72 composer ruby rbenv sassc yarn zsh
Homebrew can also help handling macOS start-up services which are useful for managing servers like Apache httpd, nginx, php-fpm, MySQL, PostgreSQL, etc.
$ brew services start httpd
$ brew services stop httpd
For quick re-installing or recovering Homebrew, I use homebrew-bundle for backing up the current Homebrew’s installation and restoring later.
# tap the bundle
$ brew tap Homebrew/bundle
# dump all existing Homebrew packages to Brewfile
$ brew bundle dump --force
# check the list of entries
$ brew bundle list
# restore/install all packages from the Brewfile
$ brew bundle
Homebrew also incorporates Homebrew-Cask (formerly an independent plugin for Homebrew) that can help to install many macOS apps as you might see in the later sections.
Terminals and Shells
Since working with Linux a lot and then macOS, I’m rather familiar with the command line. There are many cases using terminals would be more convenient than graphical editors. Thus, I need a good terminal app. The built-in Terminal app in macOS is not bad but I usually opt for iTerm2.
$ brew cask install iterm2
Some of my favorite settings for iTerms are including dark themes such as Dracula, IR_Black, seoul_256, Atom One Dark along with a fixed-width font like Source Code Pro, Cousine, Roboto Mono, Fira Code or Operator Mono (very nice ligatures and italic mode), Inconsolata or its variants (Inconsolata-dz, Inconsolata-g), or Hack. Some of these fonts can be installed via Homebrew Cask.
Along with iTerms 2, I also love Z shell (zsh) which is an extended version of Bash shell a lot with many nice features like directory alias, command completion, path expansion, etc. You might also find some Zsh configuration frameworks like oh-my-zsh or Prezto amazing to start with. I’ve tried both of them and found oh-my-zsh a bit sluggish and Prezto a bit difficult to add more extensions or customize. I have actually used a small piece from either of them and found myself quickly forgetting the customised parts taken from the others. Hence, I decided to develop a set of my own Zsh configurations. Moreover, I often keep a habit of writting Shell scripts in standard sh/bash as much as possible and keep Zsh-specific separately for better portability and compatibility.
Text/Code Editors
There are quite a number of editors in macOS for developers ranging from, er, the built-in Text Editor, Sublime Text, TextMate, TextWrangler, the nerdy Vim, Emacs, and recently Atom, Visual Studio Code, Brackets, to name but a few. You might install these editos using Cask.
In macOS, Sublime Text is often a powerful editor for many of us but it is quite costly. I used to love and work with Atom developed by Github as an effort to build a modern editor for developers. Atom has a plethora of extensions to become a very promising choice. Nevertheless, I was growing skeptical with its sluggishness in early days and therefore leaned to Visual Studio Code, my current Swiss-army-knife editor-of-choice instead.
$ brew cask install visual-studio-code
Frequently using terminal/console, I just grasp vim for quick editing tasks and customised it a little bit.
$ brew install vim
As working with larger and complex projects, I would need some full-fledged, heavy-weight IDEs such as Eclipse or Jetbrains Intellij IDEA and its brothers like PhpStorm, PyCharm. Other IDE including Netbeans, Visual Studio, Komodo can also be installed with Cask.
$ brew cask install eclipse-java intellij-idea
For Markdown editors, e.g. Github infamous README.md or my blog posts, I used MacDown. After discovering Typora, MacDown becomes second in the pecking order for now (at least until Typora’s developers announce their paid plans).
With Typora, I can directly write Markdown articles just like Microsoft Word. I can do ⌘ + / to instantly switch back and forth between Visual Editing and Source modes. Even better, I can adapt the Markdown render in Typora to be nearly indentical to my blog and therefore, experience a kind of semi-WYSIWYG Markdown editing.
$ brew cask install typora
Other nice-to-have tools
GNU Tools
$ brew install coreutils autoconf automake findutils gawk gcc gnu-sed grep
Ack
- Ack is faster and easier to use than grep
$ brew install ack
Dropbox
- Many of our customers and friends are sharing files using Dropbox, so are we ;). Note that Dropbox app must be installed in
/Applicationsto work properly.
$ brew cask install --appdir="/Applications" dropbox
Docker CE and command line
- Every serious developer is talking about and working with it ;)
$ brew cask install docker
$ brew install docker
Spectacle
- This is an amazing free app for resizing windows using shortcuts. I use it a lot to quickly arrange the working windows.
$ brew cask install spectacle
Alfred + Powerpack ($)
- Alfred is a must-have for me and, maybe, many other macOS users. The free version is useful enough but the paid (for Powerpack) can blow anyone away. Alfred helps me much more when I prefer to use the keyboard as much as possible instead of reaching for the mice.
$ brew cask install alfred
F.lux
- Saving my eyes staring daily at computer’s monitors (macOS also has Night Shift mode but my eyes still find F.lux more pleasant at night)
$ brew cask install flux
Web Browsers
- Installing Firefox and Google Chrome mainly for Web development, testing and debugging as I find Safari is, not perfect though, sufficient for daily use and conveniently sharing bookmarks and history links between macOS and my iPad and iPhone.
$ brew cask install google-chrome firefox
Remote Access
Nothing is more convenient than SSH and SFTP.
# I prefer OpenSSH to the stock BSD SSH
$ brew install openssh
# ...  love to quickly copy my public key to the servers
$ brew install ssh-copy-id
# generate key pair
$ ssh-keygen -t rsa -b 4096 -C "MacBookPro email@example.com"
# copy the public key to the host for passwordless authentication
$ ssh-copy-id user@host
Networking Tools
$ brew install netcat curl wget nmap
Communication
Skype, Slack, Keybase (open source end-to-end encryption)
$ brew cask install skype slack keybase
1Password ($)
- Help storing all of my private information and authentication in iCloud or Dropbox and using them in macOS or iOS.
$ brew cask install 1password