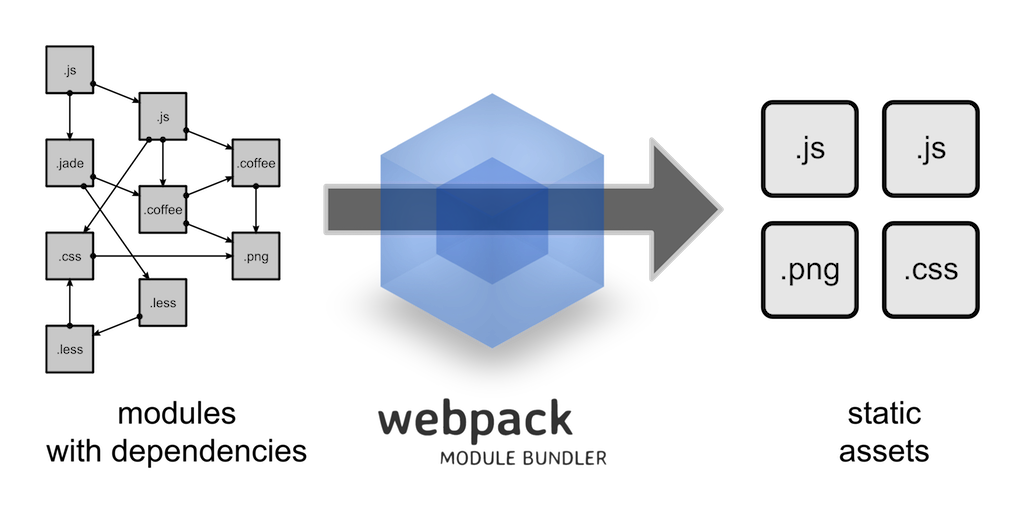
Webpack is a static module bundler for Web applications. It analyses and processes the input application and generates output bundles.
The design of Webpack architecture is highly modularised and extendable. In this post, I share here some notes on major aspects of Webpack since I’ve started learning it.
Main Concepts
Configuration
Webpack’s configuration is conventionally defined using a file webpack.config.js. It is a JavaScript/Node.js source file. A comprehensive example of webpack.config.js can be found here. The four major parts of Webpack’s configuration are entry, output, loaders and plugins.
- Entry: An entry denotes the starting point where Webpack commences buidling the internal dependency graph by analysing all direct and indirect dependencies. There might be more than one entry.
- Output: The output part defines the places where Webpack stores and how to name the outputs.
- Loaders: Webpack uses loaders to handle files other than JavaScript by transform them into modules that can be processed by Webpack. Loaders are configured using
module.rulesthat specify the propertiestest(what/which files to be transformed) anduse(which loaders to be used). - Plugins: Plugins are important part of Webpack that will carry out different kinds of tasks such as checking, combining files, optimised outputs, and so on. Webpack provides a clear interface for creating and/or extending plugins.
Modules
Webpack considers almost each file of any kinds a module. The dependencies between modules can be described via various ways, for instance using ES2015’s import, CommonJS’s require(), AMD’s define and require, and CSS’s @import. Some built-in module types supported by Webpack are including CoffeeScript, TypeScript, Babel, Sass, Less, and Stylus.
Dependency Graph
When a file or module needs another, it is considered a dependency. Webpack analyses all possible dependencies and builds a graph that includes all needed modules starting from the entry points. The dependency graph is then used to package these modules into the output bundles.
Some Typical Usage Scenarios
1. A Simple Greeting
To demonstrate the simplest and, somewhat naive, usage of Webpack, we will create a small project as following.
simple-greeting
 ├── package.json
 ├── public
 │   └── index.html
 ├── src
 │   └── main.js
 └── webpack.config.js
The package.json can be quickly instantiated using npm or yarn, as I prefer)
$ cd simple-greeting
# create a package.json with default options
$ yarn init -y
# now we use npm install webpack as a dependency of our project
$ yarn add --dev webpack
Let’s create a JavaScript src/main.js that contains our main business logic, i.e. writing out a heading 1 Hello Webpack!.
document.write('<h1>Hello Webpack!</h1>');
And we edit public/index.html.
<!DOCTYPE html>
<html lang="en">
<head>
    <meta charset="UTF-8">
    <title>Getting Started with Webpack - A Simple Greeting</title>
</head>
<body>
    <script src="bundle.js"></script>
</body>
</html>
You might have noticed that index.html uses bundle.js instead of main.js that we created above. You are right, bundle.js is generated by Webpack given the input main.js. Let’s create a config file webpack.config.js to do that.
const webpack = require('webpack');
const path = require('path');

module.exports = {
  entry: './src/main.js',
  output: {
    path: path.resolve(__dirname, 'public'),
    filename: 'bundle.js',
  }
};
After that, a simple invocation of webpack at the command line will work. Please note that npm installs the executable webpack inside node_modules/.bin.
$ node_modules/.bin/webpack
Hash: 9300b893968675cae1ef
Version: webpack 3.11.0
Time: 81ms
    Asset     Size  Chunks             Chunk Names
bundle.js  2.52 kB       0  [emitted]  main
   [0] ./src/main.js 43 bytes {0} [built]
The execution of webpack command should be successful. Now should you open public/index.html using a Web browser, you will see “Hello Webpack”.
2. Using Loaders
Several loaders have been developed for Webpack in order to handle various application resource types. An incompleted list of Webpack loaders can be found here. We will exemplify eslint-loader for analysing JavaScript sources and reporting errors, if any.
Let’s reuse the previous example webpack.config.js and add the eslint-loader.
module.exports = {
    entry: './src/main.js',
    output: {
        path: path.resolve(__dirname, 'public'),
		filename: 'bundle.js'
    },
    module: {
        rules: [
            {
                test:/\.js$/,
                exclude:/node_modules/,
                loader: 'eslint-loader'
            }
        ],
    },
};
We also needs, at least, the following packages: eslint and eslint-loader which can be easily installed. In case you need further styles or rules, you can install more packages, for instance, eslint-config-airbnb, eslint-config-google, to name but a few.
$ yarn add --dev eslint eslint-loader
For starting, we can initialise a simple configuration for eslint using the option --init and answer the corresponding questions. eslint will create a file .eslintrc.xxx where “xxx” is either “js”, “json”, or “yaml” depending on which file format you had chosen.
$ eslint --init
...
Then we can invoke webpack to trigger the loader. For example, we can add the following line in the src/main.js
document.write('<h1>Hello Webpack!</h1>');
document.write(x); // eslint will report an error here
$ webpack
Hash: 9b7cb596310bf077e30b
Version: webpack 3.11.0
Time: 622ms
    Asset     Size  Chunks             Chunk Names
bundle.js  2.53 kB       0  [emitted]  main
   [0] ./src/main.js 61 bytes {0} [built] [1 error]

ERROR in ./src/main.js

/Users/huytran/working/dev/dev-web/webpack-demo/using-linter/src/main.js
  2:16  error  'x' is not defined  no-undef

✖ 1 problem (1 error, 0 warnings)
So you can see that eslint-loader indeed caught the intended error. All errors should be fixed such that Webpack can move forward.
3. Using Plugins
As mentioned above, Webpack architecture enables the use of plugins for performing various kinds of tasks, for example, merging, minimising or uglifying source code. Many of Webpack plugins and guides can be found here or here. We take an example of UglifyjsWebpackPlugin to illustrate how plugins actually work.
Let’s modify the file webpack.config.js taken from the previous scenarios and add the plugins part.
module.exports = {
    entry: './src/main.js',
    output: {
        path: path.resolve(__dirname, 'public'),
		filename: 'bundle.js'
    },
    ...
    plugins: [
        new webpack.optimize.UglifyJsPlugin()
    ]
};
After executing node_modules/.bin/webpack again, you can see that JavaScript source in public/bundle.js has been uglified/minimised whilst the ouput of public/index.html remains in tact.
So far, we have walked through some simple scenarios. They are not quite complex and might have not yet shown all aspects and power of Webpack. Nevertheless, I hope they are sufficient for just showing the basis of Webpack architecture and how it works.
The aforementioned demo projects are hosted at Github, respectively.